Experiencing “Slow Image Load Times”?

When viewing any email message, Outlook will usually perform multi-thread content loading (many images loading at once), but sometimes Outlook will perform single-thread content loading (one image loading at a time). How will this affect your PoliteMail tracked messages?

For every PoliteMail tracked messaged, PoliteMail will supply a unique “time to read” based on the number of words Outlook counts and how many images and links are placed within a message. PoliteMail places a read-time image in the body of your PoliteMail tracked message that will take 150% of that supplied “time to read” to load completely. If for some reason, Outlook performs single-thread content loading, since Outlook randomizes the order in which images load, some images placed in the body of the message may not load until that read-time image has been completely loaded. This creates the effect of some images being temporarily broken (grey box in Outlook) or not loading at all.

This is an Outlook bug/feature that will switch Outlook behavior to perform single-thread content loading and it causes email recipients to experience “slow image load times” when users send PoliteMail tracked messages. In PoliteMail v4.6, we offer a solution for this Outlook bug.

Typically, updates to our software require no additional action. However, for users experiencing this “slow image load time” an additional set up requirement will mitigate if not eliminate this behavior in PoliteMail v4.6.

Corporate Cloud Hosted Clients:

To enable this feature, you’ll need to work with PoliteMail to update to PoliteMail v4.6. Once you have updated to PoliteMail v4.6 we can enable this setting for you on the server side.

You’ll need to:

1). Add the PoliteMail Server image host name (given to you from your account manager) to your organization’s Trusted Sites via GPO push

On-Premise Clients:

To enable this feature, PoliteMail will require a secondary “image” host name for the PoliteMail server to be added to your organization’s Trusted Sites via GPO push. Typically, this image host name will be similar to your current PoliteMail host name.

You’ll need to:

1). Create a secondary DNS entry for the PoliteMail Server image host name

2). If not using a wildcard DNS, add another SSL certificate for the PoliteMail Server image host name to the certificate store on the PoliteMail application server

3). Add the PoliteMail Server image host name to Trusted Sites via GPO Push  

Example:

PoliteMail Server Host Name: company.pmail5.com

PoliteMail Server Image Host Name: company-image.pmail5.com

By adding this secondary image host name to Trusted Sites, the read-time image will resolve to the image host name, so regardless of Outlook’s single or multi-thread content loading the read-time image, users will no longer experience “slow image load times”.

Disabling ScreenTips in Outlook

The Problem: When hovering your mouse over an actionable item in Outlook, a contextual mini-window, known as a ScreenTip, appears which will open Outlook Help if clicked. This can be annoying.

ScreenTip

To disable ScreenTips within Outlook, simply go to File > Options and change the ScreenTip style setting to “Don’t show ScreenTips“, then click OK.

OutlookOptions

ScreenTips will no longer appear.

Responsive Behavior Outlook 2013 – Images enlarged

Responsive Mis-Behavior in Outlook 2013

With the May 2015 update to Microsoft Office 2013, there has been a change in how web-referenced and embedded images are rendered in Outlook.

This change has resulted in abnormal responsive behavior of PoliteMail templates.

When you paste images into Outlook, or use Outlook’s Insert Picture tool, the images will be embedded into the message content. This means the file size increases with the image size, and the images will actually display as file attachments when sent to non-Outlook email programs.

When using PoliteMail > Add Image, you have the option (PoliteMail > Settings > Preferences > [ ] Embed Images with Message) of hosting the images instead, which reduces email file size by putting the images on the PoliteMail Server for your account and referencing them in the HTML code.

For some reason, Outlook will now expand embedded images to 100% of the outside container size, whereas referenced images are display at 100% of the actual size at most. The net result is embedded images will appear too large.

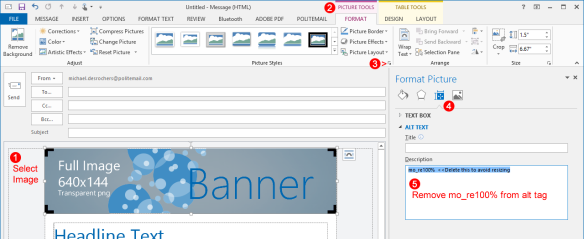
To prevent this behavior, using referenced images, or change the Alt tag in the image to prevent PoliteMail from making the images responsive (to the display container).

Select the image in the email, then right-click and select Format Picture or select Outlook Picture Tools > Expand the Format Styles menu (lower right icon).

Now click the Layout and Properties icon and expand the ALT TEXT option, and remove the mo_re100% text if you do not want PoliteMail to enable responsive images, or add it into the alt text if you do.
mo_re100%

How to Change Smart Attachments – v4.5

To change a Smart Attachment that you sent in a message, follow the steps below.

Upload the new, corrected Smart Attachment. To Upload go to Content>Smart Attachments>New.

Content-Smart Attachments

Delete the Smart Attachment you want to replace by selecting it in your Content Library then clicking on the X.

Delete smart attachment

Go back to the new Smart Attachment and click Edit>Change the name to that of the original Smart Attachment that you just deleted.

Edit

The link in the message will now redirect to the new Smart Attachment.

Contacting Support

Contacting Support

If you are experiencing technical issues with your PoliteMail account, please reach out to our server support team.

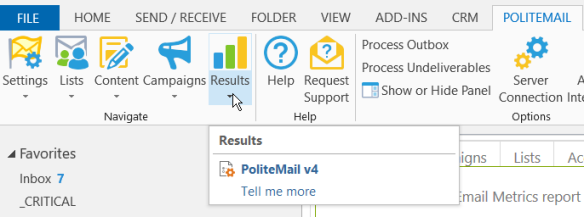
In your main PoliteMail tab, click on the Request Support icon.

Request Support Resized


Clicking on the Request Support icon will generate an email with your account information and an error log that will aid our server support team in troubleshooting the issue. Enter a brief synopsis of the issue you are experiencing and add screenshots if applicable.

Support Email

Once you send the message, a support case will be automatically created for your request and our support team will respond.

You can also reach out directly to our support team via:

Email: serversupport@politemail.com

Phone: (603)-610-6111 ext. 3

Adding Trackable Links to Messages – v4.5

PoliteMail automatically tracks any link within your email (as long as it appears as a link and Outlook has underlined the link). You may type or paste link URLs directly into your email as you normally would in Outlook. To create text or image links in Outlook:

  1. Highlight/select the text or image to want to make into a link.
  2. Use the Outlook menu Insert > Hyperlink. This will open Outlook’s Insert Hyperlink dialog.
  3. Type or paste the full URL (including the http:// part) into the Address field and click OK.

Insert hyperlink

NOTE: Links must have http:// or www. at the beginning of the URL to work.

To update a Link URL:

  1. Go to the main PoliteMail tab within your Inbox > Content > Links.
  2. Browse or search for the link you previously sent and would like to edit.
  3. Once you find it, select it then click Edit. Edit the URL then click Update.

Now when your recipients click the link you had sent, they will arrive at the new URL.


How to create a subscription list – v4.5

How to create a subscription list

A subscription list enables your recipients to opt-in and opt-out of the list themselves. Subscription lists for newsletter and other publications can be created by following the steps below.

First, you will need to create a Mailing List within PoliteMail.

From the main PoliteMail toolbar, select Lists > Mailing Lists. You can create a New list manually, import a CSV file containing the recipients or import an Outlook/Exchange distribution list. To import a list, click on Import > Select either CSV or Outlook/Exchange > Follow the import prompts.

Lists-Mailing Lists


Import List

Once a PoliteMail Mailing List is created, click on Edit and change the Subscription column to Yes.

Subscription List

Once a list is enabled for subscription, opt-in form is automatically created and can be accessed by checking the box next to the list name, select Actions > View Opt-in Page. To edit the opt-in page, select the list > click on Actions > View Opt-in Settings.

Select List

List-Actions

Once a list is enabled for subscription, it will automatically appear on the opt-out page as an option.


Adding a Simple Survey – v4.5

Adding a Simple Survey – v4.5

PoliteMail has a Q&A control that allows you to include a simple survey in an email message. Survey questions can be set as 5 star ratings, mood type, yes or no, or multiple choice selections. If permitted, the user can see the vote tally immediately after clicking on the vote.

To include a survey in your message:

1. Click on the Q&A icon in the PoliteMail message tab.

Simple Survey Icon

2. Select which type of survey you would like to use

a. 5 star rating

b. How do you feel about this? (Mood type)

c. Like, dislike

d. Like, dislike, OK

e. Yes or no

f. Yes, no, or maybe

g. Question A, B, C

h. Question 1, 2, 3

Survey Types

3. Type your question into the Question text box.

Survey Question

4. Click on Add.

5. You will receive a pop up that asks if you would like users to see the results of the survey. Select yes or no.

Survey Question 2

6. If you are using a multiple choice survey type, you can change the answer text to your desired answer options. Note: These selections are hyperlinked, so when changing the text make sure you do not break the link, as this is what tracks the answers.

Survey - Multiple Choice

To view the results of your sent survey:

  1. Go to the main PoliteMail tab in your Outlook.
  2. Select Results > Messages.
  3. Double click the email message.
  4. At the bottom of the message results screen you will see the Q&A Results.

Survey Results

Note: Message recipients can change their survey answer at any time and the results will adjust accordingly. This won’t count as an additional vote, it will simply override their previous answer.

Adding Graphic Images to a Message – v4.5

PoliteMail makes it easy to use and reuse graphic images within your email messages with the Add Graphic Image function.

You still have the ability to paste an image into your email or use Outlook’s insert picture command, but the email size will increase. This will cause the send process to slow down, particularly when sending to large lists. By using PoliteMail’s Add Graphic Image function, you will keep your list mailings small and fast.

Here’s how to add a logo, banner, picture or other graphic image to your email message:

1. Within Outlook’s email editor, place the cursor where you want the image to appear or select the image you want to replace.

2. Click PoliteMail > Add Image , browse to your image file (web format .jpg, .gif or .png) and then click Open.

Add Image

3. The image will appear in the body of the message (placed by reference) and will automatically be saved in the Content Library. Any images you have previously used will be available for reuse when you click on the Add Graphic Image button. You may also share saved graphic images with other users in your account.

To access saved images, go to Content > Images under your main PoliteMail tab. To share saved images, check off the box next to the image and click on Actions > Set Sharing. You can add new graphic images through this tab as well.

Content-Images

4. To wrap text around your image: select the image and use the Align Left, Right, or None buttons.

Note that if you paste in images or use Outlook’s insert picture function (instead of PoliteMail’s Add Graphic Image) your images will be embedded into your email message as file attachments. They won’t display as file attachments when sending to other Outlook users, however if you send to other email programs such as an iPhone, Hotmail or Gmail the images will show up as file attachments.